Eco Guide
The Eco-Guide is designed for the Troy Farmers Market and the people who attend the market every Saturday. Eco-Guides aim to reduce the human error from the market’s current waste system as it inhibits proper sorting of waste, and provide further structural support to ensure stability of their composting, trash, and recycling frames.

PROBLEM IDENTIFICATION
The first step in this project was to contact various willing organizations that would want to collaborate with the team. Through this process, the Troy Farmers Market shared that they would be interested in exploring the problem areas that they face and creating a solution for them. As a result, it was decided that the team would collaborate with the Troy Farmers Market. Based on research, it became evident that one of the main problems they had was with their waste system due to a plethora of human error when it came to differentiating whether an item goes in the compost, landfill or recycling bins. It also became clear that the farmers market needed to have more structural support to ensure the stability of each of the bins’ frames. With this in mind, the following problem statement was created: how can we create a more structurally stable and intuitive composting system for the Troy Farmers Market as it is currently prone to mixing compostable goods and trash?

IDEATION
After this, some preliminary sketches and a mind map were developed to explore the problem area in question. The mind map was used to figure out the specific important aspects that are needed for this redesign. The sketch focused on illustrating ideas of the possible linear formation of the waste disposal system and the collapsibility of the bins.


Once this was done, thumbnail sketches were made from the preliminary sketches to explore potential solutions. Different aspects of potential ideas with a varying number of perspective drawings and avenues of iteration are illustrated in the sketches. The top view of the thumbnail showcases (from left to right) an overall view of what the bins would look like, a top view of what the openings of the bins look like, a proposal of what the possible signage could look like with an idea of having repeated bins from either side coming in, a sketch showing the bin in a collapsed view, and finally, a different kind of frame for the bins. The second row (from left to right) depicts the bins with an added garbage bag holder feature, a proposal of how the inner garbage bag would attach to the bins, another iteration for signage using words (instead of symbols), a handle feature offering a potential way to carry the bins when collapsed, and lastly, a varying iteration of the frame of the bins.

All team members at this point mutually agreed that there were certain aspects to the three bins (compost, landfill, and recycle) that are more important than others like collapsibility, good signage and the lid shapes. As a result, two pinups were drawn. The first one showcases more of the signage and signifiers, while the second one focused more about the collapsibility and function features.


PROTOTYPING - LOW FIDELITY
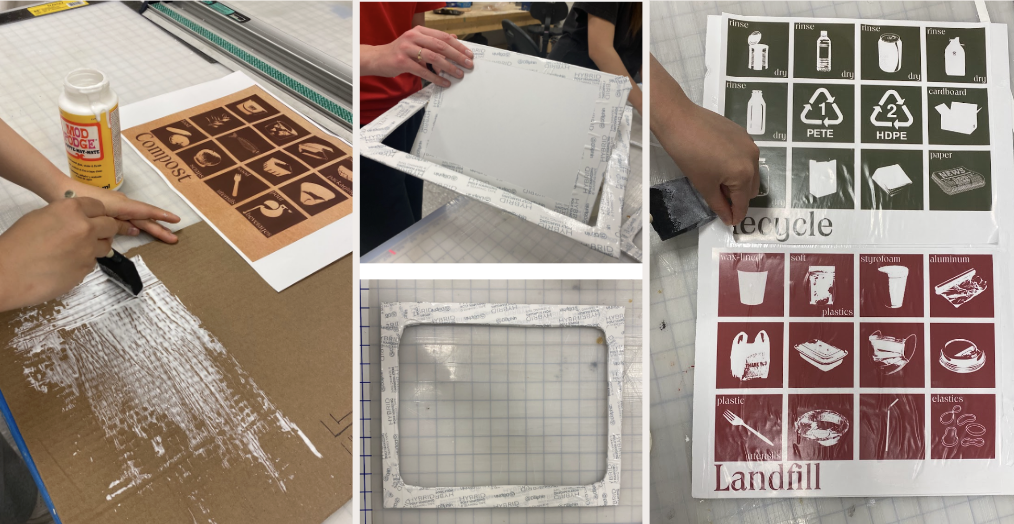
The prototyping process began with designing the signage of the three bins and printing them out on 11’’ by 17’’ glossy paper. After this, the team sketched the dimensions (13’’ by 12’’) of the different lids (for each of the bins) onto foam core and cut wallpaper into 30’’ by 13’’ sheets. The two foam core members were then attached to the wallpaper pieces to create the faces of the bin frames. Once this was done, the printed signage were mod-podged onto cardboard and all the pieces were attached using dolphin tape. Additionally, the lids were also wrapped with dolphin tape to clean up the edges and make the bins more resistant to residue. To finish this low fidelity prototype, two wood rods were inserted into the rim of the landfill lid so that it could rotate 360 degrees.

THE FINAL LOW FIDELITY PROTOTYPE:

Based on the feedback received after user testing, it became clear that the signage needed to be improved on some more. This is due to the fact that it was a bit difficult to see what each item was within the squares using the two tone design from a distance. As a solution, the signage will be larger and also include more clear words to indicate what goes within each bin. An additional change would be to add a collage to the detailed prototype. This would include actual items used at the farmers market so that users could easily match up where each item should be placed. Along with this, based on feedback provided by the market managers at the Troy Farmers Market, another change would be to measure the current wire bins used and scale the design more precisely with those measurements for an ideal fit.
HIGH FIDELITY
Due to this, the high fidelity prototyping process started off once the team measured the wire frames used at the market. Additionally now that the team knows that the Farmers Market staff do not prioritize collapsibility, it became evident that the new design should focus solely on the ease of laying over the wire frames, while making it east for the market staff to change the liners. New designs were sketched for the eco guides with a top sign, lid and front sign area. Dimensions were included in these designs so that they could then be laser cut. However since the task board wasn’t big enough to laser cut the entire eco-guide, the lids and signs were made separately. Spray adhesive was then used to attach the colored paper to cardboard and after, the scavenged materials were glued onto the cardboard to make the collage. Furthermore, new signage was designed. The grid format was replaced with less sections and a more readable font was used. Some of the icons were also changed to more simplified imagery and emphasized images (and text) that were common practices at the market.


