Vertical Whiteboard Organizer
The Vertical Whiteboard Organizer is explicitly designed for students, faculty, and patrons of the Burt Swersey Inventor’s Studio. It aims to combat organizational frustrations regarding a lack of accessibility to supplies associated with the usage of whiteboards; specifically dry erase markers. This is to particularly target the predominant issue users of the space have as it inhibits one’s ability to fully utilize a key resource within the room.

PROBLEM IDENTIFICATION
Establishing the problem space was the first step in designing this product. Given the prompt to make something that would help benefit the Burt Swersey Inventor’s Studio located in Rensselaer Polytechnic Institute’s (RPI) Russell Sage Laboratory, a mind map was created to figure out the problem areas of the studio. One of the major issues predominantly revolved around the whiteboards so it it was chosen to be explored further. With this in mind, the project objective and the problem statement was created: What can we create to reduce the general frustration experienced by DIS and MANE students regarding the lack of available dry erase markers? How can we eliminate the annoyance of the general disorganization of there not being a designated location where markers can be readily found?

IDEATION
After this, thumbnail sketches were created to explore potential solutions. Included are two distinct attempts to come up with a creative solution to solve the issue, each with a varying number of perspective drawings and avenues of iteration. The first is the vertical organizer capable of storing dry erase markers, erasers and other studio/whiteboard stationary supplies, while the second showcase a wall mounted solution to help keep track of dry erase markers. From here, a final consensus was made to progress with the vertical organizer and a pin-up was created. It depicts several perspectives and iterations of the organizer in greater detail.


PROTOTYPING
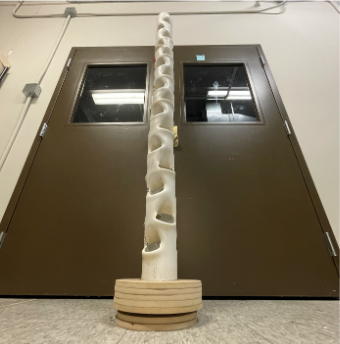
Once the designs were finalized, the low fidelity prototyping began. The overall prototype can be divided into two visual distinct components; the white centerpiece that acts as the organizer and the wooden platform. The centerpiece was originally a 10 foot (120 inches) long, 4 inch diameter white PVC pipe. This pipe was scaled down to 70 inches to account for taller users whose height is greater than 6 feet and the diameter was chosen in favor of being able to create two, 1 inch diameter openings for cups in each row. To do this, markings between rows were made 10 centimeters apart and 6 centimeters wide in a perpendicular alternating pattern, resulting in 4 columns of 8 openings to amount to 32 total openings across the entirety of the centerpiece. After this, they were cut using a circular saw. Once cut, cuts were individually heated using a heat gun in a facility with proper ventilation and penetrated with a smaller PVC pipe to mold the openings. The smaller pipe used to cut through the centerpiece was 1 inch in diameter PVC pipe and had one end cut with a circular saw resembling a 30º angle (to pierce through the heated slits and act as an anchor to be used to pull and leverage the malleable PVC to create the opening).


The second major component of the organizer is the rotating platform that the centerpiece is attached to. The entirety of the platform was cut from the same ½ inch by 2 feet by 4 feet high density wood fiberboard with 2 sheets being cut into 9.5 inch diameter circles and 4 sheets into 11.5 inch diameter circles. A bandsaw and a rotating sander were used to cut and shape each of the circle sheets. Respective sheets were joined with wood glue, clamped into place, and dried overnight before being installed onto a lazy susan bearing using screws. Hot glue was then used to attach the centerpiece onto the platform. The final result created a seamless and near-invisible installment.